Verifiable Credentials
Verifiable Credentials are a W3C standard used by development teams to fulfill a need for tamper-evident claims that can be cryptographically proven to reliably reveal who issued the claim, who (if anyone) is the recipient, the content of the claim itself, and more.
While there are multiple libraries and data model implementations available to developers who want to generate and validate Verifiable Credentials for their applications, this guide outlines one example to help illustrate these general concepts.
But First - What are Verifiable Credentials?
Verifiable Credentials offer a digital credentialing format that follows specific World Wide Web Consortium open standards. This format relies on several key characteristics that help ensure its reliability as a tamper-proof credential such as including a digital signature that cannot be inauthentically synthesized, the use of Decentralized Identifiers (or DIDs) to represent unique individual identities, and a predictable core data model that allows credential instances to be reconstructed as presentations.
Generally speaking, these components break down into three primary categories that make up a Verifiable Credential:
- Metadata: This data is often cryptographically signed by the issuer and contains information about the credential itself (such as who the issuer is, when it expires, and so on) in addition to the credential identifier
- Claim: A set of claims about the credential subject (these must be tamper-proof)
- Proof: A set of properties that allows people to cryptographically verify the source of the data and whether the data has been tampered with
A common use case to point to would be an online education platform that issues credentials when students have completed courses. A Verifiable Credential could be used to reliably show that an issuer (the education platform) attests that a given student (the eventual credential holder) has completed a specific course (included in the metadata). If a graduate student program needed to verify a given credential to accept students, those programs (playing the role of a verifier) would request proofs from the holder and be able to know whether those proofs were valid, invalid, or tampered with.
Where do Verifiable Credentials and Decentralized Storage Converge?
Given the data model Verifiable Credentials use, individual credential instances can be stored anywhere - from offline storage on a hard drive, to traditional databases controlled by companies who rely on Verifiable Credentials, to smart contracts on a blockchain, to more performant peer-to-peer storage, and everything in between. Why, then, would developers choose to store verifiable credentials on Ceramic?
Data Interoperability
Since Verifiable Credentials are flexible enough to describe a seemingly limitless set of circumstances, yet standardized enough to be able to easily verify the proofs included therein, developers who build on Ceramic not only benefit from the performance and querying capabilities offered by ComposeDB but can also consume verifiable credentials from other issuers and communities built on Ceramic.
Self-Sovereign Identity (SSI)
Verifiable Credentials contribute to self-sovereign identity in a major way by allowing users to easily prove their identity and share credentials without delegating factors of their identity to some central authority. Developers who allow their users to store their credentials on Ceramic enable their users to retain control and ownership of their data. Since streams in the Ceramic Network can only be modified with the permission of the controller, each credential saved to Ceramic can only be edited or changed in the future by the users themselves.
Ease-Of-Querying
While storing raw JSON files to other decentralized storage options like IPFS is always an option, developers who require any layer of storage at scale with the ability to filter, sort, and query data based on more precise qualities will need a storage option that provides functional similarities to a traditional database. This is where ComposeDB comes into play, offering a familiar database experience with native support for GraphQL and automatic performance gains by splitting read/write operations.
While the list goes on, let's hop into the guide.
Getting Started - Key Components
To support the functionality we need for our application that uses Verifiable Credentials, we will rely on the following tools:
Verifiable Data Registry
One of the key components outlined in the Verifiable Credential Ecosystem is a Verifiable Data Registry. This component is responsible for maintaining things like Verifiable Credential schemas. To fulfill this function, we will be using Serto, a shared repository of schemas.
Verifiable Credential Library
Our application will also require an open-source library that makes it easy to generate and verify credentials across the various formats needed by our application. For our library, we will use Veramo.
Decentralized Storage
Finally, we will be using ComposeDB to both store credentials for our user, as well as retrieve credentials to verify.
Defining Our Schema
If you sign up for a free account on Serto you'll have the ability to define credential schemas for your uses and applications. However, for our application, we will be using an existing schema definition called Vetted Reviewer (see the definition here).
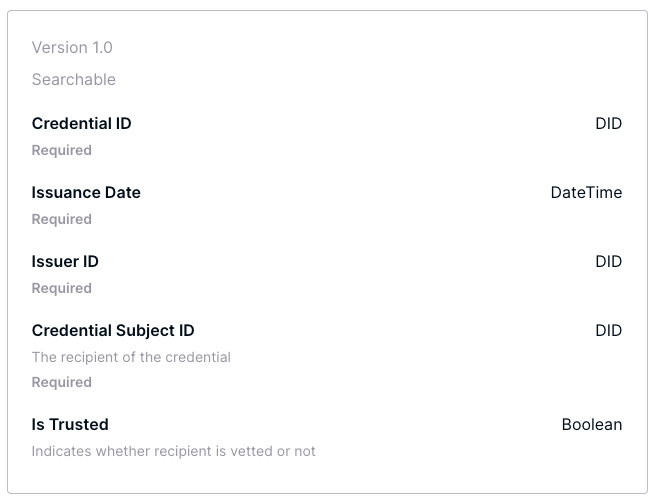
The basic idea here is that an entity (such as a workplace or group of collaborators) might want to issue Vetted Reviewer instances to code reviewers they trust. As you'll notice, the data model is quite simple - we have an identifier for the credential, issuer, and recipient, as well as a date and a simple boolean field indicating whether the subject is or is not trusted.
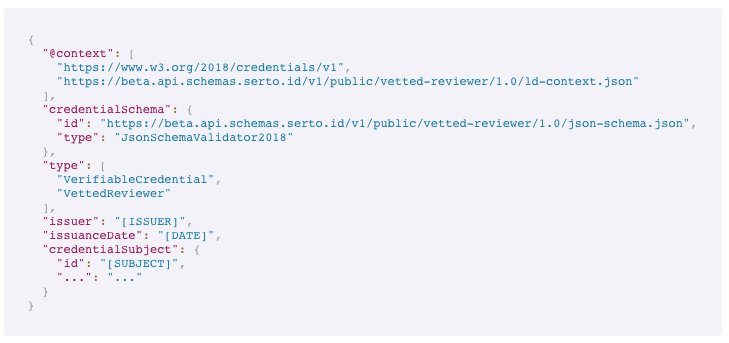
Serto also supplies a peek view into what the schema would look like in JSON format (though we will later create full instances that we can also inspect):
Setting Up Our Veramo Agent
Now that we have our schema defined that we'll use for our credentials, we can start setting up the section of our application that uses Veramo.
As outlined in the Veramo Docs, our Veramo Agent will act as our application's interface for issuing and verifying credentials, as well as managing a DID that represents the application itself.
We've already done most of this work for you, which we're about to walk through below.
To get started, open a new terminal and clone the following repository:
git clone https://github.com/ceramicstudio/verifiable-credentials && cd verifiable-credentials
Once you have the repository opened in your text editor of choice, you'll see two sub-directories - one named client and the other named express-veramo. Let's first explore our express-veramo directory.
This section of our application is meant to serve our Veramo Agent on an Express.js server that the client section of our application will use to generate and verify credentials.
Veramo Agent
If you open /express-veramo/src/veramo/setup.ts in your code editor, you can observe how we're instantiating our agent with all of the relevant plugin settings we'll need. For example, we've set our defaultProvider (on line 98 within our DIDManager instantiation) to "did:key". We've also enabled the ability to resolve "did:key" DIDs by adding a call to keyDidResolver() to our DIDResolverPlugin instantiation. Finally, we will be using a local SQLite instance (with TypeORM) to manage our Veramo Agent's DIDs and private keys.
Our agent (with all our custom configurations) will then be available to import and use within each of our methods used to generate DIDs, create credentials, and verify credentials. For example, if you take a look at /express-veramo/src/create-identifier.ts you'll see how main uses our agent to access the didManagerCreate method on the agent's prototype chain.
Finally, our /express-veramo/index.ts file exposes these agent methods as endpoints for our Express server.
Install Your Dependencies
Install your dependencies from within the /express-veramo directory:
npm install
Environment Variables
You will notice that our Express application will need two environment variables.
INFURA_PROJECT_ID: Simply go to infura.io and set up a new Web3 API key. Once set up, you will only need to copy the key itself (it should look something like "b45j76facf05112f9664778z1bf6bd50").KMS_SECRET_KEY: You can generate a KMS Secret Key using the Veramo CLI:
npx @veramo/cli config create-secret-key
Generate Veramo DIDs
We will also need to generate an admin DID that our Veramo Agent will use when generating credentials. This can be thought of as the admin seed representing our application:
npm run generate-id
We are now ready to start up our Express server! To begin, run the following in your terminal:
npm start
If all is successful so far, you should see the following in your terminal logs:
server started at http://localhost:8080
Generate EIP-712 Signed Verifiable Credentials
The EIP712 standard allows wallets to display data in signing prompts in a readable and highly structured format and also happens to be a standard supported by Veramo's modular plugins. Unlike other formats, EIP712 requires TypedData (a JSON object containing type information, as well as domain separator parameters and the message).
If you observe /express-veramo/src/create-credential-712.ts you'll notice that it looks almost identical to /express-veramo/src/create-credential-jws.ts. However, one major factor that will yield a very different output is the value for the "proofFormat" field (we use EthereumEip712Signature2021 for our EIP712 instance).
You'll also notice that the body of our credential references the schema we defined in Serto earlier, as well as the actual subject of the credential (indicating the recipient's identifier and whether they are trusted).
In /express-veramo/index.ts you'll see that we're exposing this method on our /create endpoint.
If you have Postman, you can open up a window and send a POST request to "http://localhost:8080/create" using a dummy input DID:
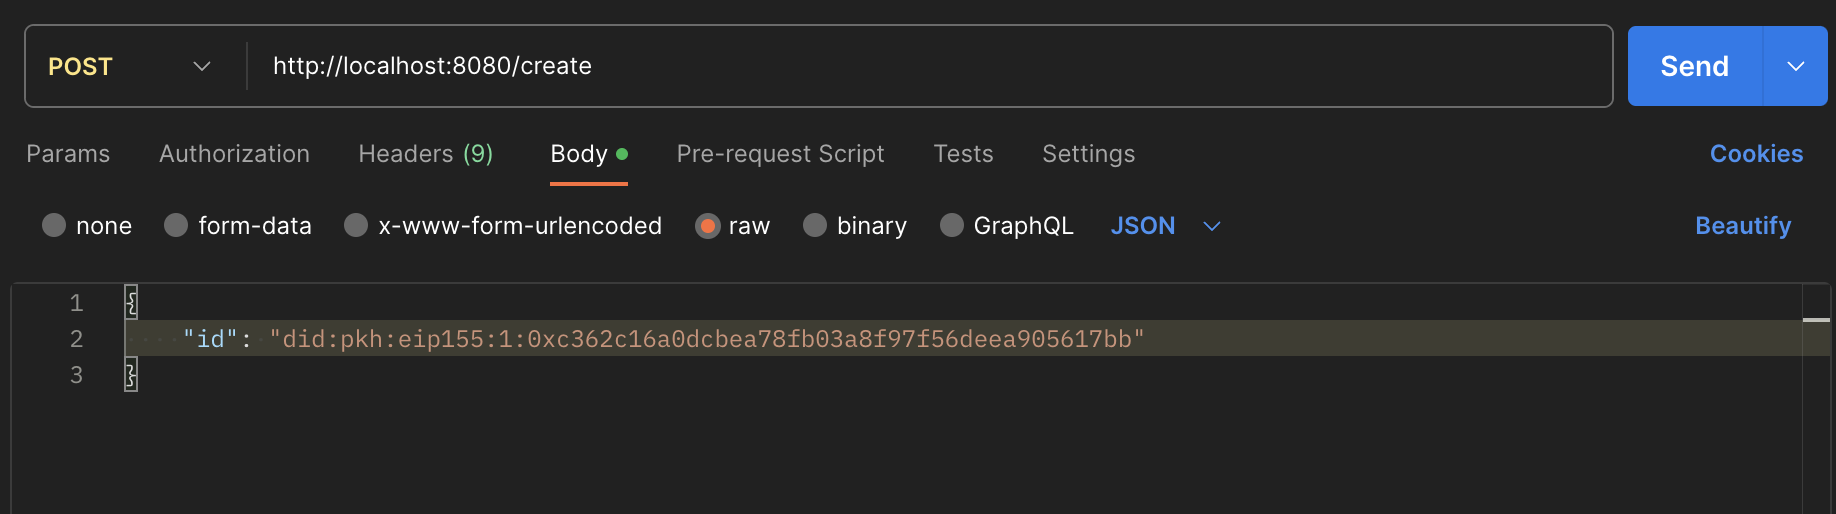
You'll be able to view the output thereafter, which should look similar to this:
{
  "issuer": "did:key:zQ3shjSvqxWu82TG8ARw6yZYvRhnAxi3MrDS7MoghVJLrUh1h",
  "@context": [
    "https://www.w3.org/2018/credentials/v1",
    "https://beta.api.schemas.serto.id/v1/public/vetted-reviewer/1.0/ld-context.json"
  ],
  "type": ["VerifiableCredential", "VettedReviewer"],
  "credentialSchema": {
    "id": "https://beta.api.schemas.serto.id/v1/public/vetted-reviewer/1.0/json-schema.json",
    "type": "JsonSchemaValidator2018"
  },
  "issuanceDate": "2023-10-24T22:10:31.906Z",
  "credentialSubject": {
    "isTrusted": true,
    "id": "did:pkh:eip155:1:0xc362c16a0dcbea78fb03a8f97f56deea905617bb"
  },
  "proof": {
    "verificationMethod": "did:key:zQ3shjSvqxWu82TG8ARw6yZYvRhnAxi3MrDS7MoghVJLrUh1h#zQ3shjSvqxWu82TG8ARw6yZYvRhnAxi3MrDS7MoghVJLrUh1h",
    "created": "2023-10-24T22:10:31.906Z",
    "proofPurpose": "assertionMethod",
    "type": "EthereumEip712Signature2021",
    "proofValue": "0xa090c41ba3a768ddf2695000ddc98009bf7dcddf9778e9d54cefcd3adbd7faaf08d4f2e9b31038112221a2d8dddbc1b0024488ea3b926400b767d1fc1ea4309b1b",
    "eip712": {
      "domain": {
        "chainId": 1,
        "name": "VerifiableCredential",
        "version": "1"
      },
      "types": {
        "EIP712Domain": [
          {
            "name": "name",
            "type": "string"
          },
          {
            "name": "version",
            "type": "string"
          },
          {
            "name": "chainId",
            "type": "uint256"
          }
        ],
        "CredentialSchema": [
          {
            "name": "id",
            "type": "string"
          },
          {
            "name": "type",
            "type": "string"
          }
        ],
        "CredentialSubject": [
          {
            "name": "id",
            "type": "string"
          },
          {
            "name": "isTrusted",
            "type": "bool"
          }
        ],
        "Proof": [
          {
            "name": "created",
            "type": "string"
          },
          {
            "name": "proofPurpose",
            "type": "string"
          },
          {
            "name": "type",
            "type": "string"
          },
          {
            "name": "verificationMethod",
            "type": "string"
          }
        ],
        "VerifiableCredential": [
          {
            "name": "@context",
            "type": "string[]"
          },
          {
            "name": "credentialSchema",
            "type": "CredentialSchema"
          },
          {
            "name": "credentialSubject",
            "type": "CredentialSubject"
          },
          {
            "name": "issuanceDate",
            "type": "string"
          },
          {
            "name": "issuer",
            "type": "string"
          },
          {
            "name": "proof",
            "type": "Proof"
          },
          {
            "name": "type",
            "type": "string[]"
          }
        ]
      },
      "primaryType": "VerifiableCredential"
    }
  }
}
Notice how the proof key in our JSON output includes both a proofValue as well as all of the TypedData details required for the EIP712 format.
If you send the same post request to the /create-jws endpoint, you will notice how the JSON web token output differs significantly:
{
  "credentialSubject": {
    "isTrusted": true,
    "id": "did:pkh:eip155:1:0xc362c16a0dcbea78fb03a8f97f56deea905617bb"
  },
  "issuer": {
    "id": "did:key:z6MkrmuQWoiVynAchQiuVwrv8nt6dU3equSFJ3ZnuSnjhnkp"
  },
  "type": ["VerifiableCredential", "VettedReviewer"],
  "credentialSchema": {
    "id": "https://beta.api.schemas.serto.id/v1/public/vetted-reviewer/1.0/json-schema.json",
    "type": "JsonSchemaValidator2018"
  },
  "@context": [
    "https://www.w3.org/2018/credentials/v1",
    "https://beta.api.schemas.serto.id/v1/public/vetted-reviewer/1.0/ld-context.json"
  ],
  "issuanceDate": "2023-10-24T22:14:09.000Z",
  "proof": {
    "type": "JwtProof2020",
    "jwt": "eyJhbGciOiJFZERTQSIsInR5cCI6IkpXVCJ9.eyJ2YyI6eyJAY29udGV4dCI6WyJodHRwczovL3d3dy53My5vcmcvMjAxOC9jcmVkZW50aWFscy92MSIsImh0dHBzOi8vYmV0YS5hcGkuc2NoZW1hcy5zZXJ0by5pZC92MS9wdWJsaWMvdmV0dGVkLXJldmlld2VyLzEuMC9sZC1jb250ZXh0Lmpzb24iXSwidHlwZSI6WyJWZXJpZmlhYmxlQ3JlZGVudGlhbCIsIlZldHRlZFJldmlld2VyIl0sImNyZWRlbnRpYWxTdWJqZWN0Ijp7ImlzVHJ1c3RlZCI6dHJ1ZX0sImNyZWRlbnRpYWxTY2hlbWEiOnsiaWQiOiJodHRwczovL2JldGEuYXBpLnNjaGVtYXMuc2VydG8uaWQvdjEvcHVibGljL3ZldHRlZC1yZXZpZXdlci8xLjAvanNvbi1zY2hlbWEuanNvbiIsInR5cGUiOiJKc29uU2NoZW1hVmFsaWRhdG9yMjAxOCJ9fSwic3ViIjoiZGlkOnBraDplaXAxNTU6MToweGMzNjJjMTZhMGRjYmVhNzhmYjAzYThmOTdmNTZkZWVhOTA1NjE3YmIiLCJuYmYiOjE2OTgxODU2NDksImlzcyI6ImRpZDprZXk6ejZNa3JtdVFXb2lWeW5BY2hRaXVWd3J2OG50NmRVM2VxdVNGSjNabnVTbmpobmtwIn0.rAhjw1_bkvY9QNSTJsoWHnsYU4ccYHngJ36x6gv567DEp85QGpz3zcKbrJAIBEdvR76C5-FcF6tSKk6TnhiADQ"
  }
}
While both versions can be reliably stored and later verified, the JWT implementation compacts all of the necessary credential data and signatures into a single field.
For this guide, we will show you how to store both JWT and EIP712 Verifiable Credentials on ComposeDB, and later how to reconstruct and verify them using our Veramo agent.
ComposeDB Server and Client Setup
You can leave your Express server running as we begin exploring the client section of the application, starting with the data models we'll need for storing our Verifiable Credentials.
If you open your /client/composites directory in your text editor, you'll find a GraphQL file that encompasses the interfaces and types we'll need for our VC data class:
# 00-verifiableCredential.graphql

## our overarching VC interface that acts agnostic of our proof type
interface VerifiableCredential @createModel(description: "A verifiable credential interface") {
  controller: DID! @documentAccount
  issuer: Issuer!
  context: [String!]! @string(maxLength: 1000) @list(maxLength: 100)
  type: [String!]! @string(maxLength: 1000) @list(maxLength: 100)
  credentialSchema: CredentialSchema!
  credentialStatus: CredentialStatus
  issuanceDate: DateTime!
  expirationDate: DateTime
}

type Issuer {
  id: String! @string(maxLength: 1000)
  name: String @string(maxLength: 1000)
}

type CredentialStatus {
  id: String! @string(maxLength: 1000)
  type: String! @string(maxLength: 1000)
}

type CredentialSchema {
  id: String! @string(maxLength: 1000)
  type: String! @string(maxLength: 1000)
}

## we'll use interfaces for our proof types to generalize them as well - this one's for EIP712
interface VCEIP712Proof implements VerifiableCredential
  @createModel(description: "A verifiable credential interface of type EIP712") {
  controller: DID! @documentAccount
  issuer: Issuer!
  context: [String!]! @string(maxLength: 1000) @list(maxLength: 100)
  type: [String!]! @string(maxLength: 1000) @list(maxLength: 100)
  credentialSchema: CredentialSchema!
  credentialStatus: CredentialStatus
  issuanceDate: DateTime!
  expirationDate: DateTime
  proof: ProofEIP712!
}

## generalized JWT proof interface
interface VCJWTProof implements VerifiableCredential
  @createModel(description: "A verifiable credential interface of type JWT") {
  controller: DID! @documentAccount
  issuer: Issuer!
  context: [String!]! @string(maxLength: 1000) @list(maxLength: 100)
  type: [String!]! @string(maxLength: 1000) @list(maxLength: 100)
  credentialSchema: CredentialSchema!
  credentialStatus: CredentialStatus
  issuanceDate: DateTime!
  expirationDate: DateTime
  proof: ProofJWT!
}

type ProofEIP712 {
  verificationMethod: String! @string(maxLength: 1000)
  created: DateTime!
  proofPurpose: String! @string(maxLength: 1000)
  type: String! @string(maxLength: 1000)
  proofValue: String! @string(maxLength: 1000)
  eip712: EIP712!
}

type ProofJWT {
  type: String! @string(maxLength: 1000)
  jwt: String! @string(maxLength: 100000)
}

type EIP712 {
  domain: Domain!
  types: ProofTypes!
  primaryType: String! @string(maxLength: 100)
}

type Types {
  name: String! @string(maxLength: 100)
  type: String! @string(maxLength: 100)
}

type ProofTypes {
  EIP712Domain: [Types!]! @list(maxLength: 100)
  CredentialSchema: [Types!]! @list(maxLength: 100)
  CredentialSubject: [Types!]! @list(maxLength: 100)
  Proof: [Types!]! @list(maxLength: 100)
  VerifiableCredential: [Types!]! @list(maxLength: 100)
}

type Domain {
  chainId: Int!
  name: String! @string(maxLength: 100)
  version: String! @string(maxLength: 100)
}

type CredentialSubject {
  id: DID! @accountReference
  isTrusted: Boolean!
}

## define our EIP712 type that uses a hard-coded credentialSubject specific to our use case
type VerifiableCredentialEIP712 implements VerifiableCredential & VCEIP712Proof
  @createModel(accountRelation: LIST, description: "A verifiable credential of type EIP712")
  @createIndex(fields: [{ path: "issuanceDate" }])
  @createIndex(fields: [{ path: "issuer" }]) {
  controller: DID! @documentAccount
  issuer: Issuer!
  context: [String!]! @string(maxLength: 1000) @list(maxLength: 100)
  type: [String!]! @string(maxLength: 1000) @list(maxLength: 100)
  credentialSchema: CredentialSchema!
  credentialStatus: CredentialStatus
  issuanceDate: DateTime!
  expirationDate: DateTime
  proof: ProofEIP712!
  credentialSubject: CredentialSubject!
}

## define our JWT type that uses a hard-coded credentialSubject specific to our use case
type VerifiableCredentialJWT implements VerifiableCredential & VCJWTProof
  @createModel(accountRelation: LIST, description: "A verifiable credential of type JWT")
  @createIndex(fields: [{ path: "issuanceDate" }])
  @createIndex(fields: [{ path: "issuer" }]) {
  controller: DID! @documentAccount
  issuer: Issuer!
  context: [String!]! @string(maxLength: 1000) @list(maxLength: 100)
  type: [String!]! @string(maxLength: 1000) @list(maxLength: 100)
  credentialSchema: CredentialSchema!
  credentialStatus: CredentialStatus
  issuanceDate: DateTime!
  expirationDate: DateTime
  proof: ProofJWT!
  credentialSubject: CredentialSubject!
}
What we've done here is generalized both our VerifiableCredential schema by using an interface, as well as their corresponding proof types. This allows us to query as general as we want (with our entrypoint on the proof-agnostic VerifiableCredential interface), as well as looking specifically for the VerifiableCredentialEIP712 and VerifiableCredentialJWT types that contain credentialSubject fields specifically tuned for our use-case.
Model Instance Controllers
This example application was also intentionally set up to display two different ways a development team might choose to implement model instance ownership. More specifically, it may make sense (under certain situations) for the application itself to have the exclusive ability to change model instance documents after they are created. Conversely, as mentioned toward the beginning of this guide, developers may instead allow their users to retain control of each credential instance (since they know that it would be easy to tell whether a credential has been tampered with anyway).
The dummy UI entails two pages found at /client/src/pages/index.tsx and /client/src/pages/jwt.tsx which respectively use the components found at /client/src/components/VC712.tsx and /client/src/components/VCJwt.tsx. You'll notice how the VC712 component calls an API within the createCredential method found at /api/create (after obtaining an EIP712 Verifiable Credential from our Express server).
If you take a look into /client/src/pages/api/create.ts, you'll find the corresponding route definition. Notice how we call an authenticateDID method before running a mutation query to authenticate a static seed environment variable (which represents our application's DID).
Conversely, you'll notice how the createCredential method within our /client/src/components/VCJwt.tsx component executes a mutation query on our compose instance. If you dig a bit deeper, you'll notice that we (as the individual user) are already authenticated on the ComposeClient instance (imported from /client/src/fragments/index.tsx).
Getting Started
To get started in the client section, we'll first have to install our dependencies (be sure to cd into your client directory):
npm install
Next, we will need to generate an admin seed and ComposeDB configuration our application will use. This example repository contains a script found at /client/scripts/commands/mjs that generates one for you (preset to run "inmemory" which is ideal for testing).
To generate your necessary credentials, run the following in your terminal:
npm run generate
Finally, you will need to create a .env file with a SECRET_KEY - this is what our /client/src/pages/api/create route will use to authenticate us as the developer on our ComposeClient instance (this must be 32 bytes and must be different from our admin_seed.txt).
Feel free to copy-paste this dummy seed into your .env file:
SECRET_KEY="11b574d316903ced6cc3f4787bbcc3047d9c72d1da4d83e36fe714ef7891jb50"
Finally, go ahead and start your application in development mode (switch to node v16 first):
nvm use 16
npm run dev
Interacting with the UI
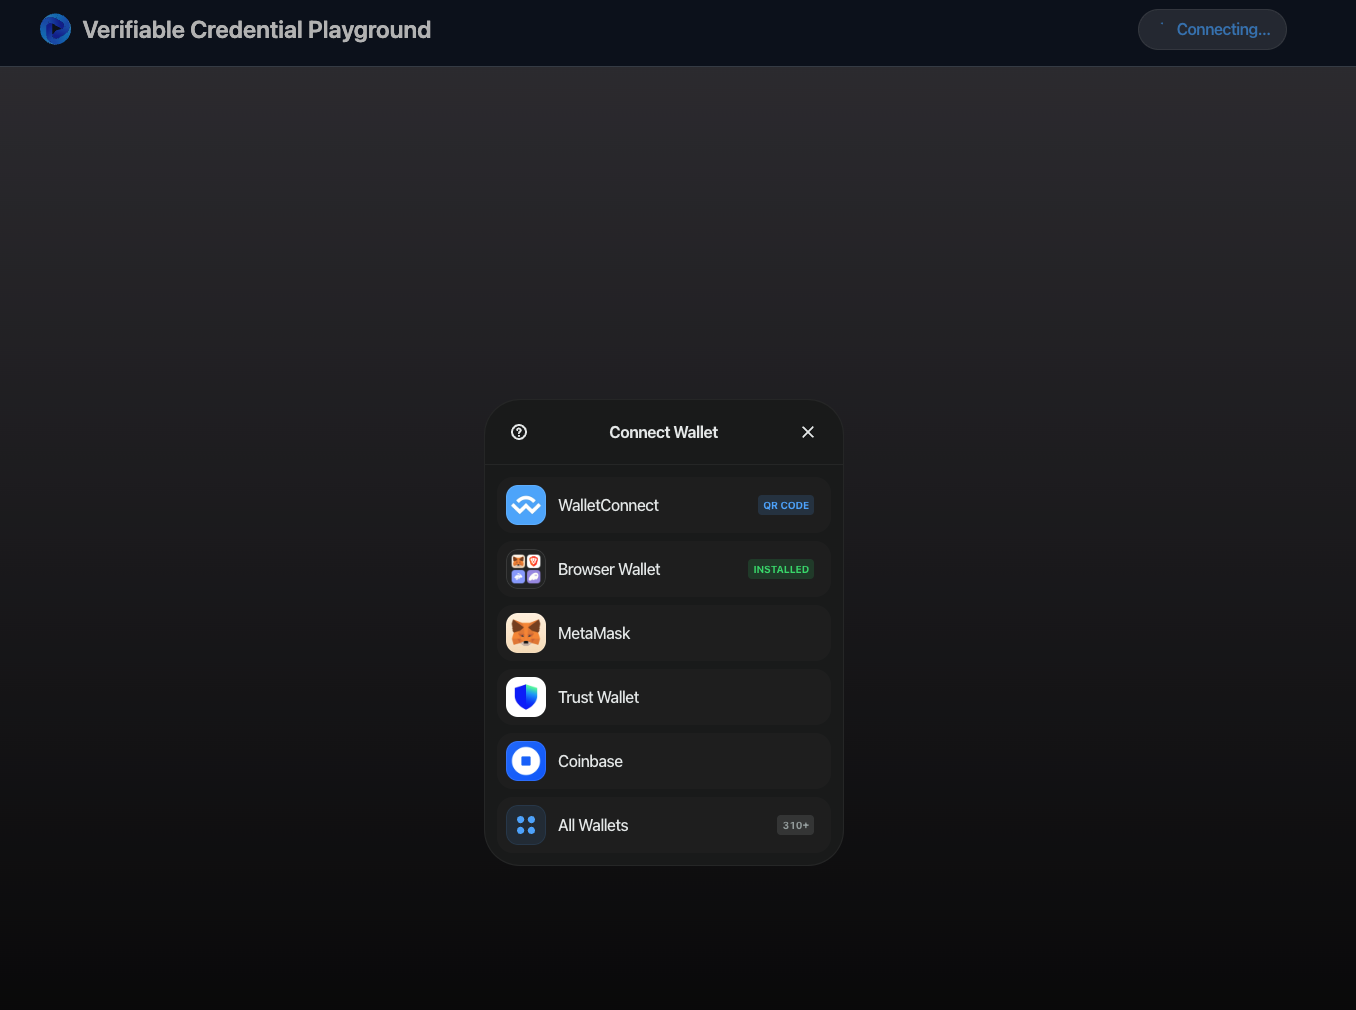
If you have been following along up until this point, you should be able to access the UI in your browser on port 3000. Go ahead and connect your wallet using the Web3Modal:
While our UI in this context does not illustrate a setup that would be used in production, readers following this guide should imagine an application's flow whereby users log in, exhibit behavior by performing tasks, and receive verifiable credentials signed by the application.
In our case, we're mimicking this behavior with the simple push of a button, which you'll see after logging in:
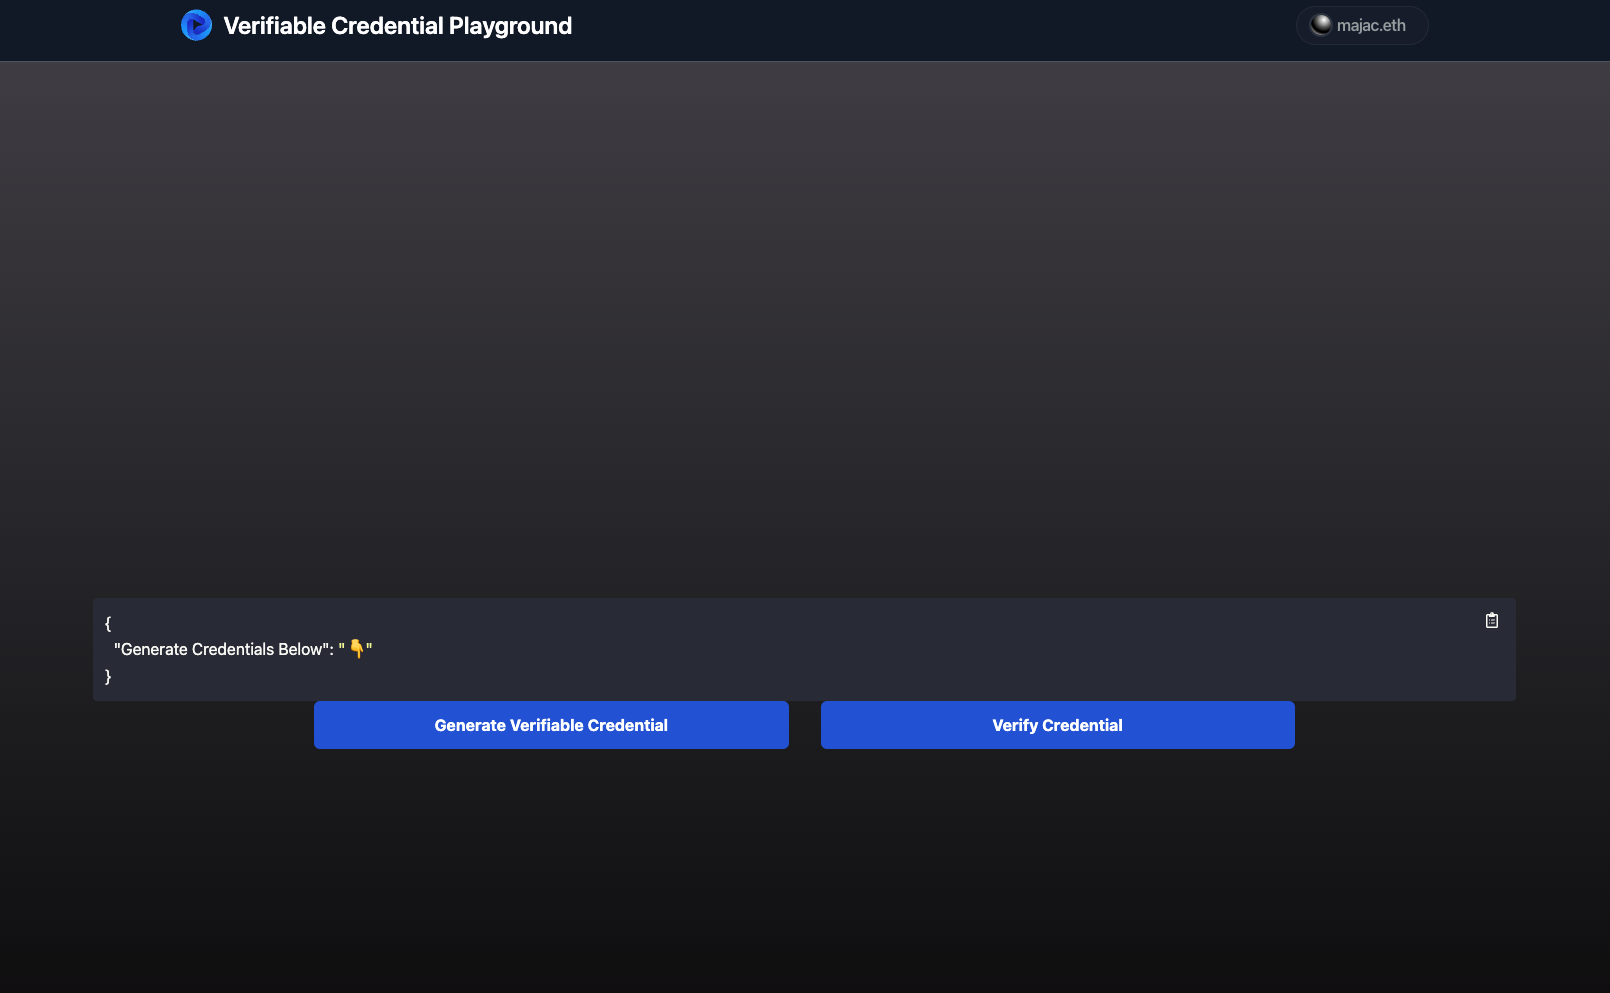
Jumping back to your text editor, you'll see how the Generate Verifiable Credential button click is tied to the createCredential method found in /client/src/components/VC712.tsx. This method then sends a fetch request to our Express server running on port 8080 with the /create route, thus invoking a response from the corresponding createCredential method at /express-veramo/src/create-credential-712.ts. You'll also notice how we're sending over our user's "did:pkh" DID (which we saved in our local storage for easy access) to be used for the id field in our credentialSubject key within our credential.
Finally, back in our React component, you'll see how we use the result of this fetch request to hit our endpoint at /api/create, which generates a model instance document using our application as the controller DID (which we discussed above).
Go ahead and click Generate Verifiable Credential to see this in action.
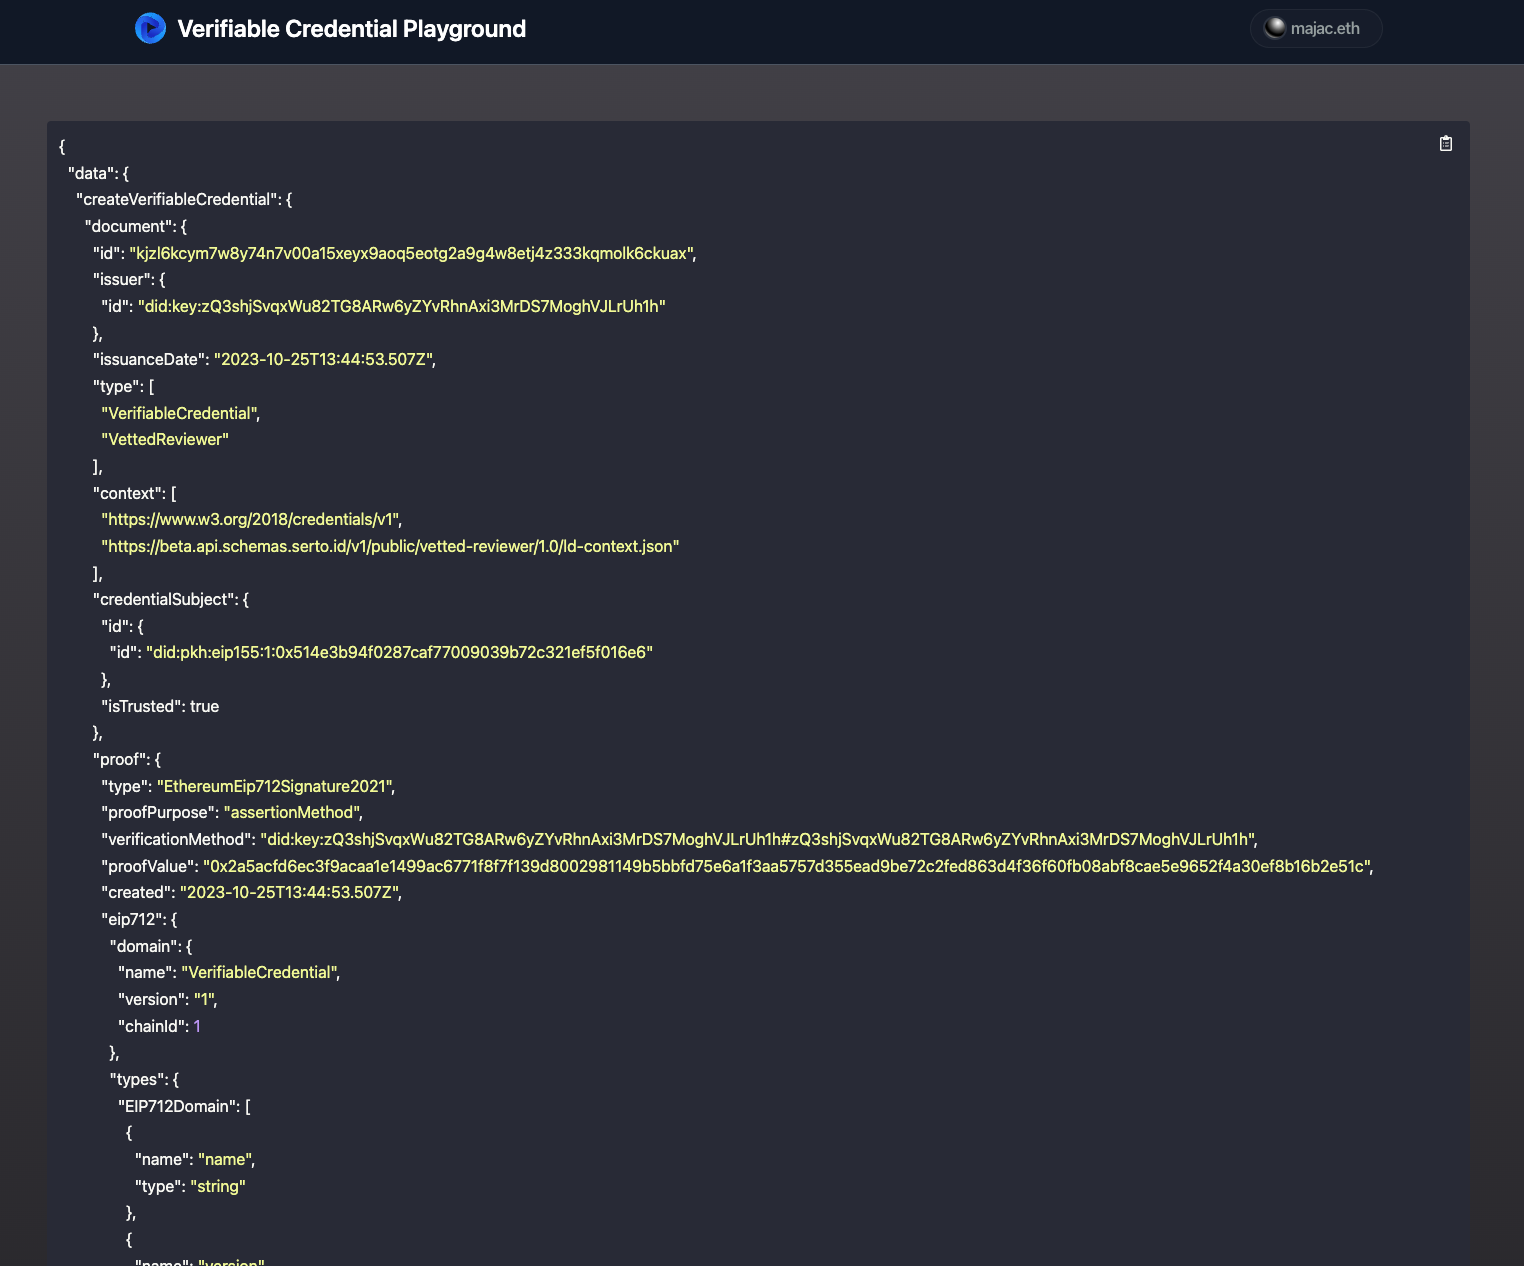
If you generated a few dummy credentials using Postman in the previous section, you'll notice that the output looks the same. You should also now see your own "did:pkh" appear within the credentialSubject key.
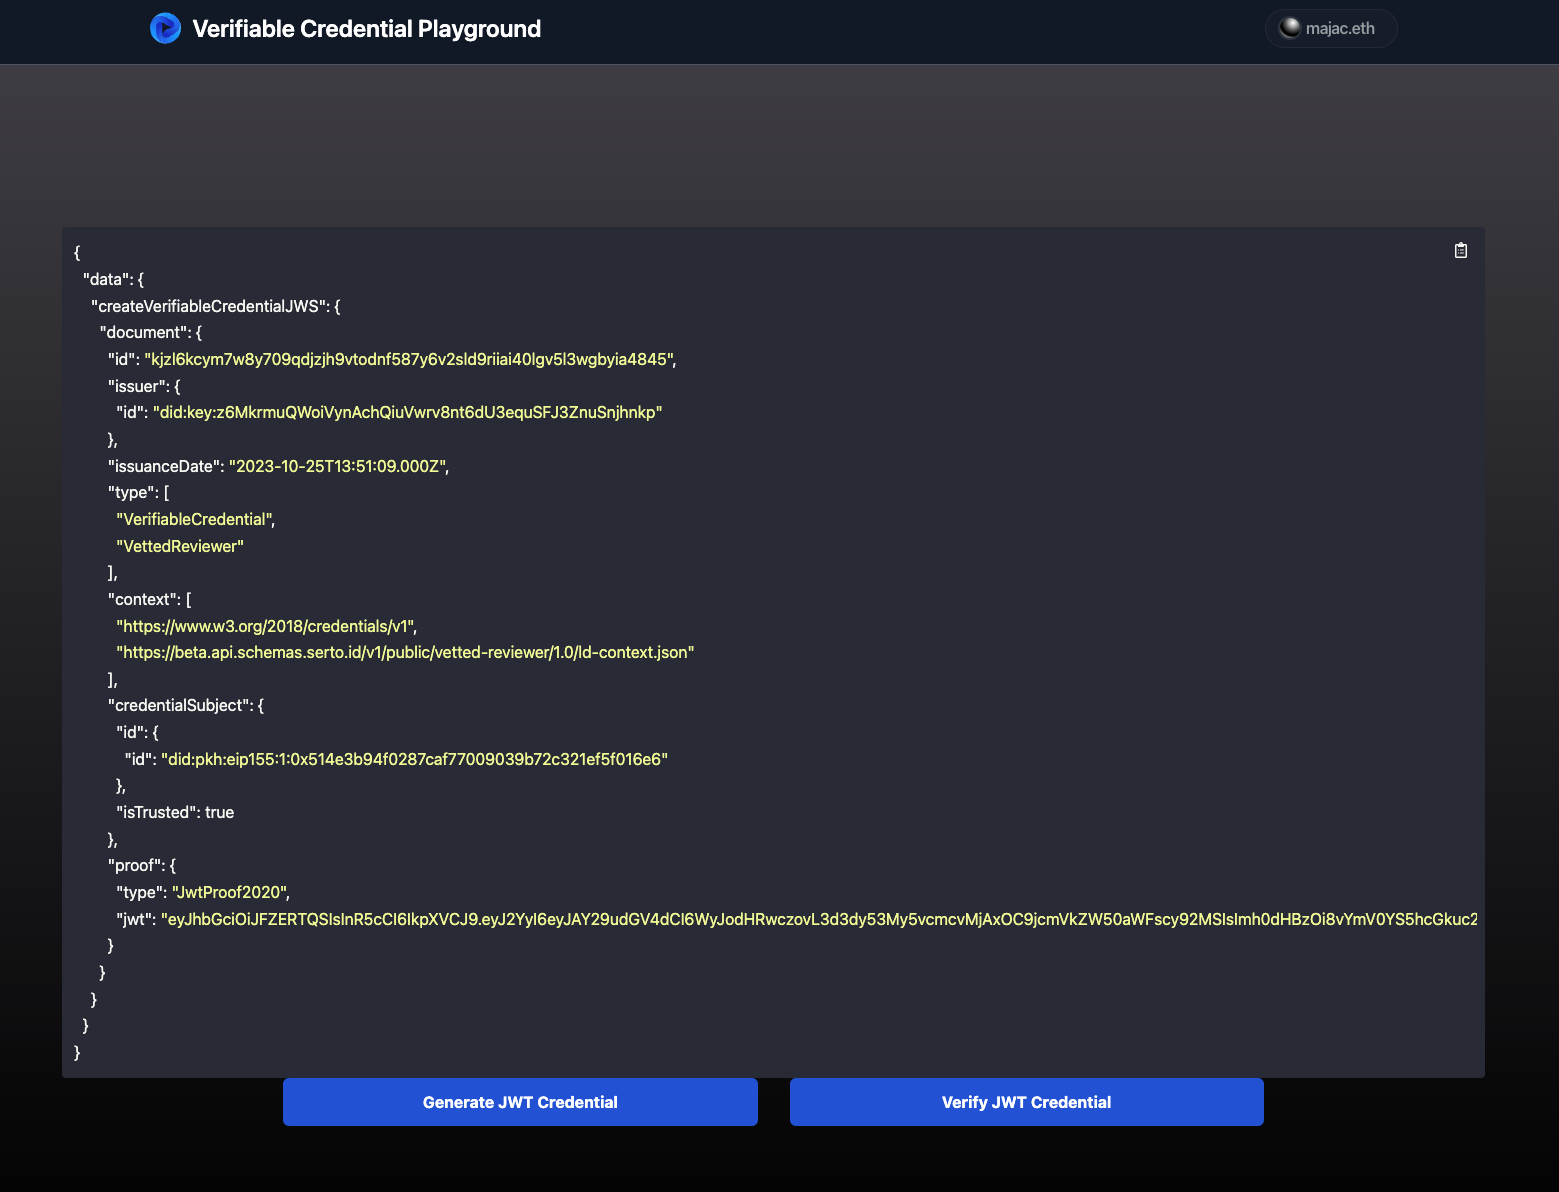
Creating JWT Credentials
If you navigate to localhost:3000/jwt in your browser, you will be able to generate credentials using JWTs (and with yourself, the user, as the model instance controller in ComposeDB):
Verifying Credentials
One item we haven't yet discussed is the process of verifying credentials. Given how this process entails querying ComposeDB and reconstructing a credential instance for verification, we should also discuss what changes we had to make between the original credential output from Veramo and the saved result in ComposeDB.
You'll notice that both of our ComposeDB schema definitions save the entirety of the Veramo credential output except for changing the name of the "@context" key to "context" (given field naming constraints in GraphQL). We therefore replace the name of this key with "context" when running our mutation query, but must also reconstruct it when querying ComposeDB and reconstructing our credential.
Given that you're already on the localhost:3000/jwt page, we'll jump into its corresponding component at /client/src/components/VCJwt.tsx. You'll notice how our verifyCredential method (tied to the Verify JWT Credential button) adds an @context key-value pair to our final object (and deleting the context pair) before hitting our Express server at /verify-jws.
If you take a look at /express-veramo/src/verify-credential-jws.ts you'll see how we deconstruct our payload during the verification process (you can also see how this is done for our EIP712 verification route at /express-veramo/src/verify-credential-712.ts).
Go ahead and click "Verify JWT Credential" if you still have localhost:3000/jwt open in your browser:
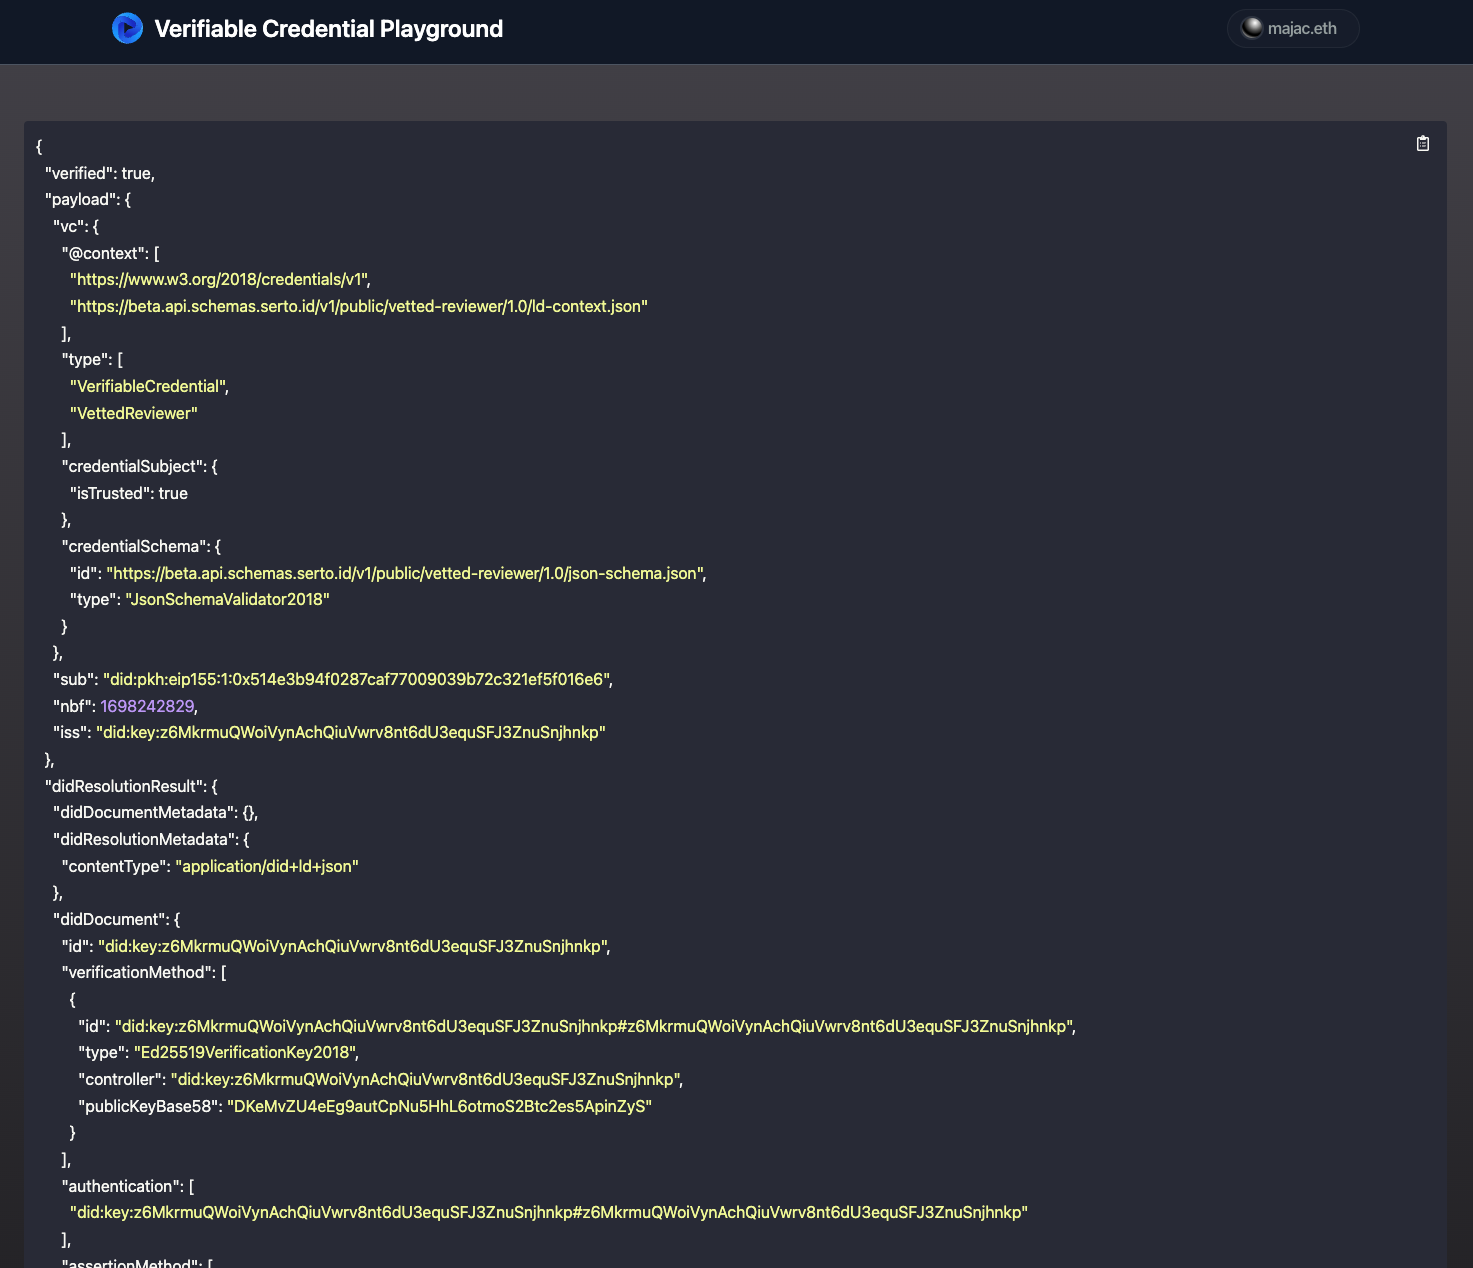
Back in our /client/src/components/VCJwt component you'll notice that we first make a fetch request to /api/query-jws route (found at /client/src/pages/api/query-jws) to grab the most recent VerifiableCredentialJWS instance from our ComposeClient. Note that in a production setting when dealing with multiple users and many instance documents, your query might instead filter based on the user's DID.
Finally, our VCJwt component then hits our verify-jws Express endpoint we just discussed to retrieve a response from our Veramo agent.
Querying interfaces
Back in your browser window you can access an integrated instance of GraphiQL by visiting http://localhost:3000/query:
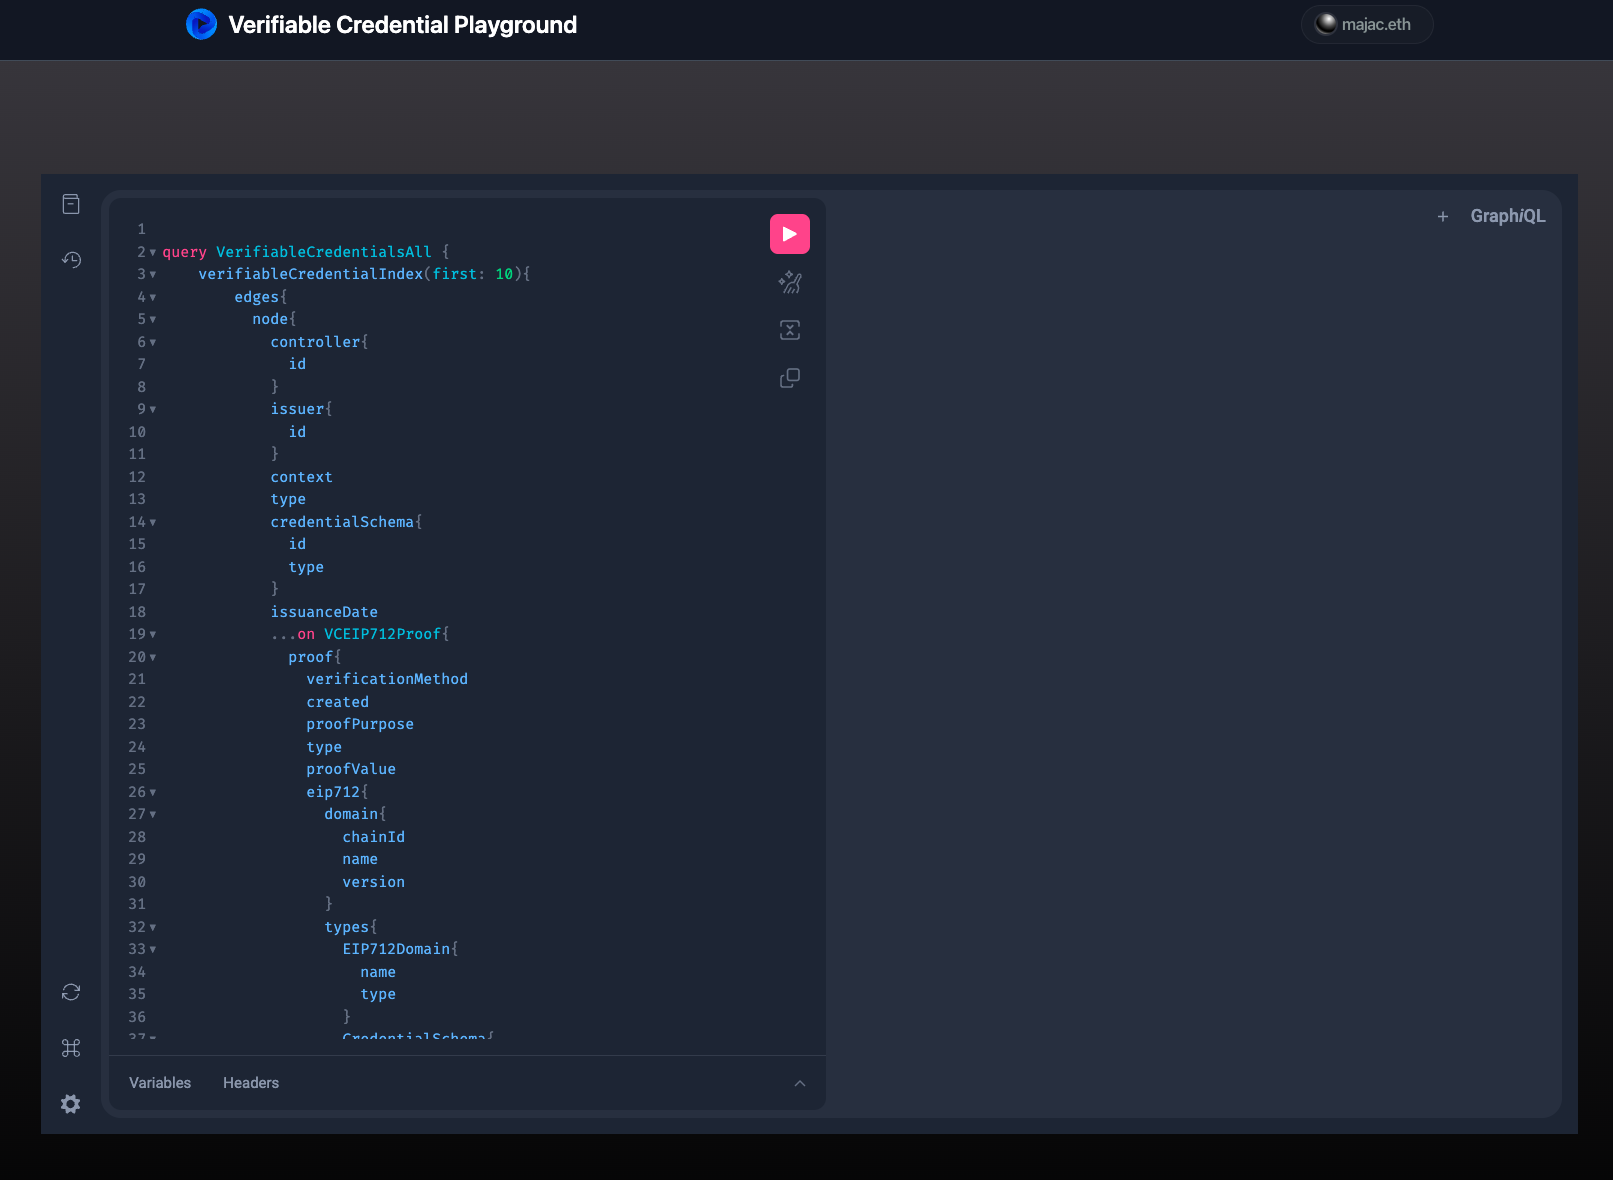
If you look at the query that's been generated for you, you'll see that we're using the general VerifiableCredential interface as the entrypoint, while still being able to grab corresponding proofs that are of EIP712 and JWT types:
query VerifiableCredentialsAll {
  verifiableCredentialIndex(first: 10) {
    edges {
      node {
        controller {
          id
        }
        issuer {
          id
        }
        context
        type
        credentialSchema {
          id
          type
        }
        issuanceDate
        ... on VCEIP712Proof {
          proof {
            verificationMethod
            created
            proofPurpose
            type
            proofValue
            eip712 {
              domain {
                chainId
                name
                version
              }
              types {
                EIP712Domain {
                  name
                  type
                }
                CredentialSchema {
                  name
                  type
                }
                CredentialSubject {
                  name
                  type
                }
                Proof {
                  name
                  type
                }
                VerifiableCredential {
                  name
                  type
                }
              }
              primaryType
            }
          }
        }
        ... on VCJWTProof {
          proof {
            type
            jwt
          }
        }
      }
    }
  }
}
Feel free to experiment further with GraphiQL and test out other interface entrypoints, or by specific known StreamIDs or DIDs.
Next Steps
We hope you've enjoyed this example implementation of using ComposeDB to save and retrieve Verifiable Credentials. However, you may be wondering what else is possible in the realm of verifiable claims, or you may have a need to allow your users to encrypt their claims when saving to Ceramic.
Here are a few resources you might find useful as you continue to discover what's possible with ComposeDB:
- Creating Attestations with EAS - Learn how to use the Ethereum Attestation Service to generate a different class of verifiable claims called "Attestations".
- Lit Protocol with ComposeDB - Follow a tutorial that shows how to use Lit Protocol for access control together with ComposeDB.
- Encrypted Data on ComposeDB - Learn yet another way to encrypt and decrypt data on ComposeDB by generating an
encryptionDidinstance.